The Building of Aqua Lisa
by Michael Hunt
My son Jason and I regularly canoe with friends
on our annual summer vacation to the central Idaho mountain
lakes. We also sail our small sailboat, an Escape Expedition,
every summer. Jason had become more interested in canoeing than
sailing, so I suggested that he build his own canoe with me
as his helper. He was very excited about the project, so we
began the search for a good design that would meet his needs.
Although he is a big 12 yr. old and the size of many adults,when
we finally finished, he was only a 5th grader when we began.
He settled on Jim Michalak's Toto
because it was better sized for a smaller paddler than many
full size designs, and in Jason's words “it looks cool”.
He was very intrigued by all of the builder modifications that
he found on the internet and began planning his own.

The plans were ordered in the fall
of 2001, and we began work during Christmas break. We picked up
some exterior grade luan plywood at a local supplier, and I began
teaching Jason how to transfer the lines from the plans to the
plywood. After he had cut out the panels, I decided on a lark
to boil a piece of scrap luan. After 5 min. of boiling the edges
began to curl up from the core. It didn't completely delaminate,
but we decided not to chance it and returned the extra sheet and
purchased some A/B grade marine fir. We remarked the sheets and
then set them aside to work on another project.
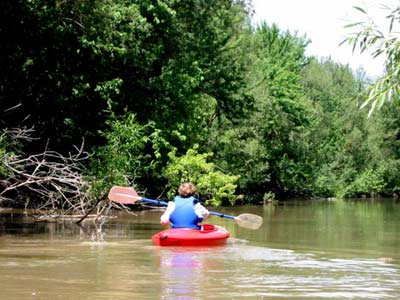
Exploring the backwaters of Lake Lowell,
Nampa, ID.
Camping, soccer and motorcycle
trips kept us distracted for a year. We did some paddling on a
local lake with some recreational kayaks borrowed from a friend.
Finally in April 2003, we dragged the sheets back out of storage
with the intent of getting on the water by early summer.
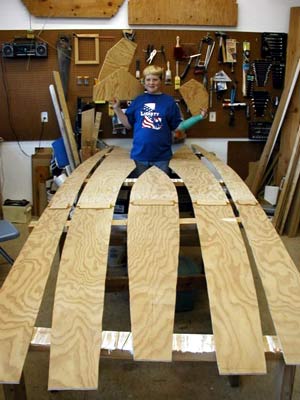
All of the panels, transom and bulkheads
cut out.
The sheets were joined by butt
blocks and quickly cut out. Jason decided early on that he wanted
to deck the canoe front and back. In the back he would use the
top hatch shown in the plans, but for the front he wanted to put
an access hatch through the bulkhead at the front of the cockpit.

The hatch on bulkhead B4 after creating
the opening with a flush trim bit on the router. At 6” x
9” it is just big enough to pass a gallon milk jug through.
The dry fit of the forms, bulkheads
and side panels went very quickly. One of the butt blocks pulled
the lamination away when a panel slipped to the floor, but a little
epoxy and a clamp fixed that. Jason unscrewed each joint of the
dry fit, swabbed on some epoxy, refastened the screws and very
quickly the panels began to look like a boat.
All of the bulkheads, forms and side panels
dry assembled with 1" Sheetrock screws.
The excitement level was running
high at this point, but other projects and commitments would delay
our work until early July. We were leaving on our annual camping
trip on July 12th, so on July 5th we returned to work with a vengeance.
We worked on the boat every morning before I left for work and
before and after supper every evening. Most of the work was either
gluing or painting, so we entered the “hurry up and wait
for something to dry” mode.
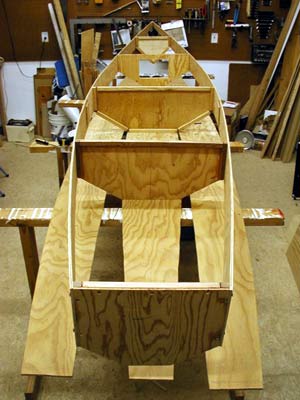
The bilge panels stitched in, the ash gunwales
glued on and the duct tape on the outside chines. Ready to flip
and putty the inside seams.
The temperatures were in the high
eighties in the morning and pushing 100 at night, so everything
dried quickly, and the medium hardener epoxy was setting way too
fast. We battled the temperature until the day we left on vacation.
The epoxy was kicking in the mixing cup and was curing as we smoothed
it on the boat. We both grew frustrated at the rough finish but
were determined to finish the boat and knew that the problem was
only cosmetic. I was careful to make sure that we were meeting
Jason's expectations. He was very pleased with the way the boat
was finishing up and was only worried that we wouldn't have time
to paint it
before we left.

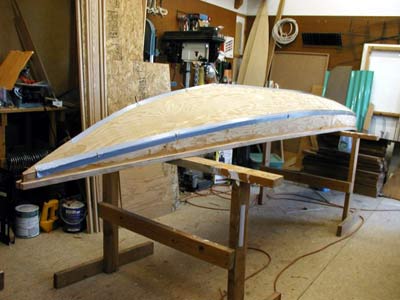
The duct tape left a very nice surface where
the inner putty worked clear through. It only required a little
scuffing. Jason used 80 grit paper on the belt sander to dress
all of the chines and transom.
The decks were cut from a sheet
of 1/4” okume and dry fit with a few screws. A flush trim
bit was used on the router to match the deck to the edge of the
gunwales. Jason scavanged a piece of 1/4" Lexan out of the
scrap box and cut it the width of the rubber seal larger than
the front hatch opening. A bungee cord and some eye bolts became
the fastening system.

The hatch is held fast and did not leak
despite several intentional dunkings on launch day.
The interior of the boat was painted
with exterior latex primer the day before we left on vacation.
A scrap of 3/4” cherry became the skeg. It was rough shaped
and set in epoxy putty the night before we left. We would paint
the boat and fasten the decks in camp. Time to load up. I hoped
we wouldn't forget anything.
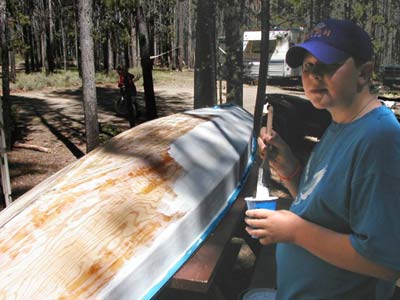
Jason priming the exterior.
The day after we reached camp the
painting vigil began. The weather was cool, and we tried to get
two coats on a day. While waiting for the paint to dry we used
a friend's boats to run a Class 1 section of the Salmon River.
Jason has really taken to paddling, and it is probably time to
get
a canoe for me and sell the sailboat. Finally Jason announced
that we had fussed enough, and it was time to launch the boat.
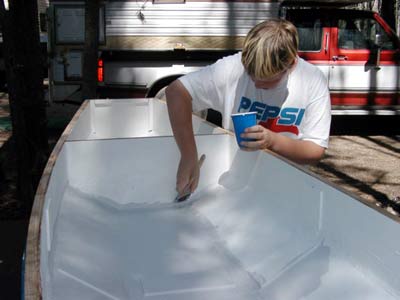
Light gray for the cockpit.
Redfish Lake was to be the launch
site. The water is clear and cold and the view of the Sawtooths
is breathtaking. She was named 'Aqua Lisa', a name that had come
up several weeks ago during a break from smearing epoxy in the
90 deg. heat when we were worried about the outcome of the finish.
Jason had declared that she was a work of art for the water.
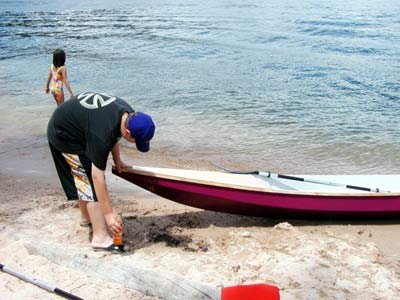
Christened with some orange crème
soda.
Jason paddled Aqua Lisa for about
an hour and finally let the rest of us have a try. She paddles
beautifully. She is fast and tracks straight, but when making
a slow turn the skeg does not hinder the turn.
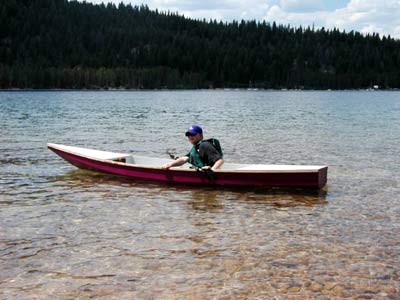
First paddle away from shore. All smiles.
The second outing was a 3 hr. moonlight
paddle down a quiet portion of the Payette river with glow sticks
tied to the boats and the full moon lighting our way. We were
the guests of an eating group that has a paddling disorder. Halfway
down the river they haul out on an island and
break out food and drink. Jason received many compliments on his
boat. Many were surprised that it was possible to build your own.
This winter over Christmas break
we will shape the skeg, varnish the decks and gunwales, fit the
rear hatch and touch up the paint. The plans for a Larsboat have
arrived. It will be my boat and I hope to start on it soon.
The builder and his helper can
be reached at michael@sailingwaters.com
visit the Aqua Lisa Construction
Site
|