Part Two
Part
1 - Part 3
After the hull has had a couple of days to cure,
and more time in colder weather; it was time to start
the fit out of the interior. This was going to be
a single person boat and I was going to use and modify
the interior parts a bit from the 10ft Hudson Springs
Pram. I wanted to add an extra set of side bracing
bulwarks and change the shape of the bow compartment
so the hatch was on the aft panel, and not inset into
the top panel. Make it a little easier on the bottom
if someone goes out with you. Other than those changes,
the only other modifications were placing some backing
blocks for the bow and stern handles, blocks for the
anchor brackets, and some bracing for an electric
outboard.
Before I measured for any of the interior parts,
I wanted to get the inner and outer rails glued and
screwed to the hull, to set and define the curve of
the sheer line. I wanted to do this before any of
the bulwarks or the bow compartment panels were installed,
so the rails would not be trying to add tension or
compression forces to the hull sides and distort the
shape of the bottom panel.
I was showing my friend Bob how to measure the angles
and set the tablesaw to cut the compound angles needed
to get the corner blocks to fit. Things went well
until I set one of the blocks 180 out in the miter
gage and cut the wrong angle. After some do as I say's
and not as I do's in corner block cutting 101, I was
able to salvage the block, readjust the dimensions,
make the others the same size. In my plans, I let
you decide how wide and long they should be, so you
can make last minute (*&^%$) changes. With the
blocks cut, it was time to put on some glue and screw
them into their corners. Make sure you mark the screw
locations on the top edge of the panels. You will
need to know their locations later when you add the
outer rails. Be careful here, as the corner blocks
set the heights for all the rails to be shaped to.
 |

|
I always try and cut out my rail material ahead
of time, mark which end is the bow, and which side
is the top, and on which side of the hull the matched
inner and outer rails go on. I then separate them
into two stacks, side by side, and tied together loosely.
The outer rails on the bottom, the inner rails on
top of it's mate. Then I put the ends on blocks to
lift both ends of the rails off the floor, and put
sand bags in the middle to bend them down again. As
the days go by, I add more bags and move more of them
closer to the bow end, still keeping one near the
middle/aft end. The rails start to adjust and you
can tell as there is less rebound from the rails when
you press down on them.
 |
|
I try to get the stern inner and outer rails installed
first. This helps keep the stern panel from taking
on a curve as the hull sets in your shop. I try to
keep some 2x2's clamped to the bow and stern panels
until I'm ready to fit all the rails to prevent this;
and a cross bar to hold the sides apart and in place.
I mount the outer stern rail first, since the outer
ends need to be trimmed before the outer side rails
go on, as they extend to the very end and cover the
stern rail. The outer bow rail covers the forward
part of the side rails. I usually add the inner stern
rail after I have glued and screwed the outer in place.
Use the same set of clamps to hold both. After the
glue has cured, I hold my draw saw to the side of
the hull and trim the ends of the outer rail.
The hardest part is to get the bow end of the rail
at the right height to start with. I usually drill
a centered hole in the bow end of the rail, and with
a screw in the hole as a center punch. The hardest
part is knowing when everything is lined up. This
is were it's nice to have a friend help you with this
task. Have the friend hold the stern end of the rail,
down and away from the hull so you can locate the
bow end. When things look good, press the rail into
the hull to mark the screw points location for drilling
the hole later. Drill the hole if things are lined
up and then drive a screw (not tight) in place to
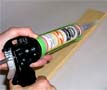
check. If things look good, get out the clamps and
glue/epoxy. I've been using Gorilla Glue for this,
but I may change to Gel-Magic with the mixing tip.
My plans call out the sizes and placement for the
screws used to attach the rails to the hull. The bow
rails go on last.
 |
|
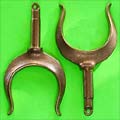
Normally I do a rough shaping of the rails and corners
after everything has cured. But with this hull I didn't
know where it's balance point would be so I could
mount and shape the oarlock socket blocks. I needed
to install all the interior parts, and as many of
the extra do dads, to find the “balance point”.
Lucky for me, Bob had all the fishing do dads that
I could place around the hull, and Chuck at Duckworks
had the kayak hatch and handles that I needed.
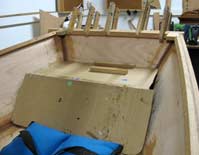
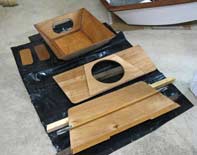
The kayak hatch diameter set the width of the rear
panel, and I used this same width for the top panel
too. I made some cardboard templates, so I could trim
, and re-trim them to fit the hull. Once that was
done, I could take the measurements and fit the plywood
panels to the shape of the hull. With the bow compartment
panels fitted, the bulwarks cut and fitted, and the
seat pyramid cut and fitted; it was time to give everything
a good coating of epoxy to seal the edges and panel
faces. Remember to do this to the hull too, under
where all the interior parts will go, because they
will later cover everything up. Give then a couple
of good coats to extend the life of the boat.
 |
|
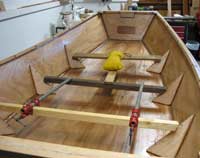
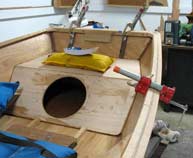
Now it was time to “jump stitch” the
parts to the hull; except the seat pyramid. I still
need to balance the hull. Mix up some EZ-Fillet and
“bag it”, using a small opening in the
corner of the bag. Tack the pieces to the hull and
let cure. The photos show how I held all the bulwarks
in place, and the “equalizing sticks”
I used to keep the bow compartment panels in alignment.
After a nights cure on the jump stitches, it was time
to do a fillet job on all the seams. Sand around the
seam edges and wet out to the outer width of the tape
you will use. I used 3” tape. Place and shape
the fillets to your liking and either stop for the
day and let the fillets cure, or lay down the tape
and wet out. I did the place, shape, and tape thing,
but I think I will go to place and shape the fillets
and tape the next day. Part of the change in my doing
things is distorting the fillets while brushing around
on them when wetting out the tape. Especially on the
bulwarks.
 |
|
But I may not. I have since figured out how to presoak
the tapes and then place them. I had seen this done
before, but with a special production ($) machine.
I tried doing this on another boat, by using a squeegee;
but the squeegee tried to tear and pull the tape out
of shape, so I abandoned that idea. I had used an
old 4” paint roller on some epoxy, and it became
garbage, but as I was pulling the plastic center part
of the roller off the handle, the light bulb went
on. I scraped off the foam and had a nice round, free
wheeling roller. I laid some black plastic on a 2x6,
and then a strip of 2” tape ( I was fitting
the seat pyramid at the time) on top of this new setup.
A little dribble of epoxy along the tape, and a couple
of rolls back and forth; and I had one of those black
monolith, jawbone pounding, trumpet blaring, Ta Da,
moments. Evolution, or was I always meant to do it?
The pre-soaked tape laid on top of the plywood seam
like spoons in a drawer. I hardly had to do any finish
work; just a touch here and a dab there, and used
a lot less epoxy in the process. Your gloves get a
bit sticky, but just watch what you touch. On the
longer tape runs, just roll/fold it up as you wet
out the tape, and then roll/straighten it back out
on the hull. Be careful you don't fuzz up the ends
when you do this. You could leave the ends dry until
placed.
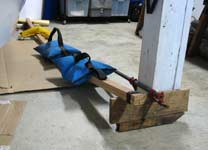
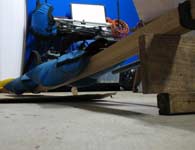
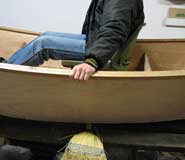
Once all the interior parts were installed, I placed
all the do dad's in their respective places, and set
about balancing the hull. I have an old broom that
I use for this and placed in under the boat. I can
then turn the broom handle and the boat moves fore
or aft, depending on which way I am turning the handle
at the time. When I found the sweet spot, I started
moving the seat pyramid with the seat on top, back
and forth (also fine tuning the broom with small twists)
to find the “balance point” that I was
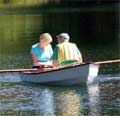
trying for. I wanted the boat to balance centered,
to reduce the wetted surface area in the stern while
rowing. I also wanted to get as much real estate in
the aft part of the boat for the person fishing; and
when they stood up, that the boat would be as level
as possible in the back one half. To check this I
played “Rock a bye builder, in his work shop”
to make sure I was correct in my assumptions. The
sea trials will let me know if I am correct or not.
 |
|
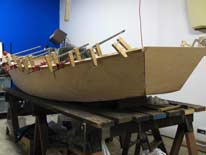
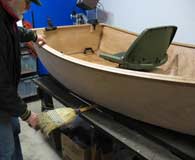
With the interior complete it was time to flip the
hull and work on the bottom. I got the edges filled,
rounded, and covered with a layer of 2” tape
and a couple of keel strips, but I flipped it back
over so I could epoxy the rails, and paint the interior.
I want the inside to be drying and curing while I
finish off the outside. I will be using LPU two part
polyurethane on the outside and it needs a week or
so (if the weather warms up a bit) to cure before
I plop the boat in the water. Shiny dark green on
the outside and a light tan marine enamel on the inside,
with reddish brown rails. Should look great. For a
lot more information on what I'm doing with this boat,
check out the extra photos I've added to my gallery
at www.flickr.com/photos/flycaster. Up to 200 now.
That's 200,000 words you don't have to read. ;) Until
the next time, thanks for reading my stories and looking
at the photos.
Warren Messer
Red Barn Boats

Other Articles by Warren Messer
|