Part 2 - Making Plans
Part 1 - Then and Now
Last issue, I talked a little about the history and purposes of half hull models. In this article I’ll talk about how you go about getting plans to make your own half hull of either a historical ship or your own boat.
Historical Models
If you’d like to build a model of a famous ship, you’ve got many options. First of all, WoodenBoat magazine offers several sets of plans for half hull models. These are for ”lift models”, glued up from several layers of wood. The plans provide templates for each layer, great for making the most economical use of your wood. The selection is somewhat limited but the plans are great. I’ve built a couple from their plans.
If none of these ships strikes your fancy, there are many other sources of plans. The Smithsonian, Mystic Seaport and many other museums offer copies of plans. These range from sailing vessels to modern ships. I’ve built models of everything from the US Brig Niagara to a modern atomic submarine from these kinds of plans. Search the Internet and you’ll find numerous plans providers at reasonable prices.
Recreational Boats
Plans for the kinds of boats you and I operate are harder to come by. Many of the current boatbuilders will not provide lines plans to outsiders. I have occasionally been able to get some plans by signing a release stating I would only use the plans for building a model, but this is rare. Sometimes the lines plans are published as part of a boat review so check back issues of boating magazines. The boat builder’s brochures might also have plans. In any case, gather all the literature you can on the boat you want to model.
Make your own plans
Your last resort is to make your own plans. Before starting, you need to decide what kind of model you intend to make. One option is an architectural model, one that is made to a very accurate standard. Making plans for this kind of model is very time-consuming. It requires a great deal of preparatory work, stringing lines and establishing datum marks to measure from, before the actual measuring takes place. It takes me at least a full day to take the lines off even a small boat. And that’s before I can even start drawing the plans.
Representative Models
However, if you’d just like to make a model that looks like your boat, to decorate your office or den, there is another way. The first step in the process is to gather information about your boat. Find all the brochures and literature you can find. Several people on the ‘Net offer copies of old boat brochures. These often have overhead or side views that can be helpful in making your plans.
The next step is to photograph your boat. Naturally it has to be out of the water or on its trailer so the full hull is visible. Take profile pictures from the side of your boat. You can take several and piece them together, just make sure you take each picture as the same distance from the boat. In the example, I took a bow, middle and stern shot. I also took pictures of the bow and stern of the boat, with the picture centered on the centerline of the boat.
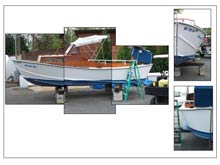
Photo #1 |
Photograph your boat. Naturally it has to be out of the water or on its trailer so the full hull is visible. Take profile pictures from the side of your boat. You can take several and piece them together
click images to enlarge |
The new digital cameras are great for this process. The pictures in this article were all shot using a Kodak DX3500 camera. I then uploaded them into my PC for further work. Using the photo software that comes with most digital cameras, I was able to manipulate the size of the photographs to come up with a side view of the boat in the right scale. If you don’t have a digital camera, use a regular film camera and manipulate the photo size using a photocopier with an enlargement feature.
The boat used in these examples is about 22-feet long and I was easily able to come up with photos that measured 22 inches – a 1-foot to 1-inch scale. I then taped the individual photos together to make the composite picture (Photo #1). The next step was to tape tracing paper over the picture. The paper I used was actually graph paper with a quarter inch grid on it. With the paper in place, I traced the outline of the boat: sheer, keel, bow and stern. Station lines were then draw on the graph paper. The station lines are locations where cross-sections of the hull will be drawn, defining the shape of the hull. The exact spacing of the stations aren’t critical, just make them at places you can easily measure on the real boat.
| With the paper in place, I traced the outline of the boat: sheer, keel, bow and stern. Station lines were then draw on the graph paper. |
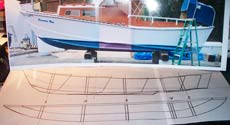
Photo #2 |
Take the graph paper plans to your boat and begin measuring the widths of the various parts of each station (see Drawing #1). If you did your photo work right and set the drawing to a particular scale, transferring those measurements to the top view of the hull will be easy. Again, this is a representative model; don’t obsess over the nearest sixteenth of an inch.
With the station measurements in hand you can now draw the top view of the boat, showing the sheer and the chine or chines (if you have them). Draw a smooth curve through all the points on your drawing with a flexible spline. A piece of balsa wood or spruce from a model shop works fine (see Photo #2).
Drawing #1 |
Take the graph paper plans to your boat and begin measuring the widths of the various parts of each station. |
Once the top view is finished, you can go back to the profile or side view and draw in the outlines of the cross section or frames of the model. A pair of dividers does a great job of transferring the dimensions from the top view to the profile view (see Drawing #2).
This really constitutes the majority of the detail needed to build you model (see Drawing #1). You might want to sketch in the location of the waterline, any spray rails or other details you want to add to your model.
| A pair of dividers does a great job of transferring the dimensions from the top view to the profile view. |
Drawing #2 |
Well, that’s it in a nutshell. Don’t be spooked; it really is a straightforward process. Next time, we’ll discuss how to turn your new plans into a model you’ll be proud to hang on your wall.
Paul Esterle
Freelance Boating Writer
Capt'n Pauley's Place
The Virtual Boatyard
*****
|