|
Seeing many of the one sheet creations out there has got my creative juices going on these long nights. So always being up for a challenge I have come with this offering as a one sheet boat. It is only a model like quite a few of my creations so far as we have little room for too many boats here. Perhaps someone would like to have a go at a full size version just for the hell of it and let me know if it performs OK!
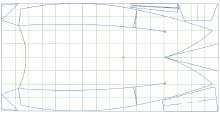
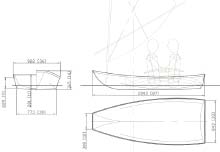
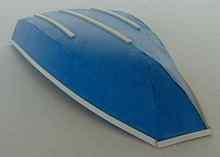
I enjoy playing with the forms you can create in a flat sheet of plywood so have tried to build curves into all the elements of this craft to give good shape and strength using a 4mm sheet. I am sure most 4mm Plywood will work to the curves if gently forced to. Attempting not to waste too much of the sheet I have come up with a couple of ideas which may seem different to the usual (odd perhaps?) the first is the curved shape at the bottom of the transom and rear of the bottom panel, it gives a nice curve to the bottom and strengthens up the transom nicely pulling it in two directions and you only lose the saw kerf in cutting. The second is the side panels which when cut you will swap to the oboist side of the hull this allowed me to get a little more curve into the mid to rear part of the boat. At the joint between the main panel and the side panels the angle can make quite a difference to how much the bow will rise. If you want a lot of rocker bevel the sides only a little more. I would suggest that the sides and the main panel are held together with a cleat made form some of the waste ply on the inside and taped and resin bonded on the outside. Fixing the sides to the bottom should be the first thing to do, getting them aliened and to the same shape will make a big difference to the final shape the hull forms. Finally the overlapping cuts at the bow and the curve formed on the pram type front gives the whole thing a bit more beam and a smother shape to enter the water.
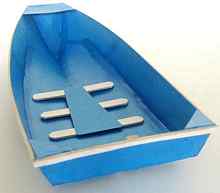
It is however a small hull and you will need to keep your weight low as possible to be stable. To this end I have added a small board on some cross bearers to sit on and spread your weight over the thin bottom panel- this should keep you out of some of the bilge water. These seat bearers sit directly over three rubbing strakes running on the bottom panel.
You will also need an amount of solid material to finish the hull. I give a list as a guide you can round up to whatever is available where you live. I use a readily available redwood which has reasonable strength to weight and is durable enough on occasionally used boats.
I would think a small sail could be added with a simple rudder and lee board arrangement and it should not be too tippy, but I would not think it will move that fast as we are working with a very short hull here. Then consider adding some air bags in case the worst happens.
Just an idea if you were really adventurous you could make up some air bags using some PVC material. Then fix these to the gunwales and at the bow turning it in to a semi ridged which would give more free board, buoyancy and a little more beam as well. That is something to think about later! If any readers are interested in trying their hand Tom Yost provides all the know how on his excellent website under the section inflatable kayaks at www.yostwerks.com.
List of solid timber
Gunwales 6 x 2440 x 34 x 6 (8’ x 1 ¼” x ¼”) this will be laminated to form the gunwales at 34 x 12 (1 ¼” x ½ “).
Bearers 1 x 2440 x 68 x 12 (8’ x 2 3/4” x 1/2”)
Rubbing strakes 1 x 2440 x 18 x 10 (8’ x 3/4” x 3/8”)
Disclaimer: I am not a boat designer, while I have tried to come up with something that will do what it is supposed to the attached drawings are only an amateur’s attempt and no assumption should be made as to the integrity or safety of the design. Any one building this craft and mad enough to use it does so at there own risk. You have been warned!

|