A Jig for Cutting Stringer
Scarfs for the Seaclipper 20
To Part One
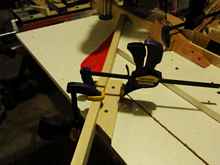
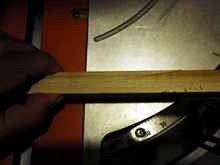
So, now we are about to make a scarf. The stringer stock as shown
in Fig. 8 is clamped to the jig in position against the angled
fence block. Three clamps are used. One clamps down on the stringer,
and the other two are butted against each face of the stringer
to help prevent undesired movement of the workpiece. Version 1.2
is a little better for this, as we will see.
Before we proceed with version 1.1, let’s practice a few
safety checks:
IMPORTANT: Test the path of your blade again and make sure you
are not going to hit any clamps and that you are not going to
hit your saw’s metal fences behind the back stop. Anytime
you change the miter or bevel setting of your saw, you have to
check your fences and the saw path to make sure you don’t
have obstructions. Double check that your clamps are secure.
IMPORTANT: Use a roller stand or the like to help support the
other end of your stringer stock that extends off the jig. If
you don’t do this, the long stringer stock workpiece may
want to pivot up off the table using the table edge as a fulcrum.
IMPORTANT: Where you stand is important. Stand to the right of
the saw and to the right of the jig. Don’t stand in front
of the saw or to the left of the saw. Don’t stand between
the workpiece and the saw. I might be more paranoid about this
than is necessary, but so be it. Standing to the right seems safer
and it has the further benefit that I am not tempted to put either
hand down on the jig table during a cutting operation.
Then the blade is lowered to make the cut. When the cut is complete,
and WITH THE BLADE STILL LOWERED, release the power button so
the blade comes to a stop with the saw blade down. Don’t
raise the blade until the blade has fully stopped. Years ago when
I first purchased this saw, a carpenter friend instructed me to
do this on all operations on this saw as it reduces the chance
that offcuts will be thrown. This has been good advice over the
years. Working carefully with attention to detail, it does not
take long to cut 32 scarfs using this jig, including bundling
and labeling the matching pairs.
 9 9 |
 10 10 |
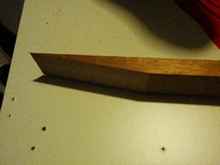
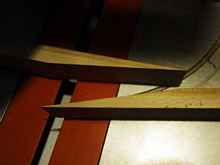
The resultant scarf made with jig version 1.1 is shown in Figs.
9 and 10. To give a sense of scale, this test piece of scrap wood
is a 1 x 3. The SC20 stringer stock is generally ¾ x 1
¼, or about half the width of this test piece. Version
1.2 has a desirable improvement as we will see. The scarfs look
the same with version 1.2, but I think the workpiece is held more
securely to the jig.
Version 1.2 adds a clamping block to the front of the table.
Otherwise, everything else is the same. This addition provides
a much more secure way to clamp the workpiece to the jig.
 11 11 |
Fig. 11 shows the new block attached to the base with two pocket
screws. Only two clamps, not three, are needed to hold the workpiece
securely on the jig. You still need outfeed support to support
the far end of the workpiece.
 12 12 |
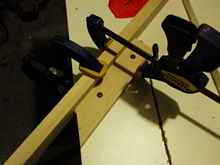
Fig. 12 is a birds eye view of the new block with a workpiece
clamped in position. Note from both Figs. 10 and 11 how both clamps
are well outside the red zone. Recall that the red zone is where
the saw blade and the saw guard hang out. No clamps are allowed
in the red zone.
 13 13 |
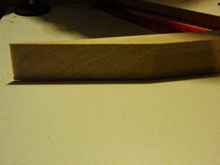
Fig. 13 shows a pretty good looking scarf made on stringer stock
using jig version 1.2. But how does this work in an actual joint?
The proof is in the pudding after all.
 14 14 |
 15 15 |
Fig. 14 shows two complementary scarfs facing each other. Fig.
15 shows the scarfs held together with light finger pressure on
one end of the joint only. The joint line is really hard to see
when clamps are used to bring the scarfs together.
Version 1.2 of this jig is a keeper.
*****

|