A Jig for Cutting Stringer
Scarfs for the Seaclipper 20
To Part Two
My construction of the Seaclipper 20, a devilishly interesting
trimaran designed by Jim Brown and John Marples, continues to
progress at a steady pace. What's interesting about the build
is that there are some tasks that are straightforward given my
current skill and tool sets, and yet there are other tasks that
have taken some thinking and planning in the noodle chair to devise
a way to handle such tasks efficiently and safely. One recent
task in particular was totally new to me. I had now reached the
stage in my building process where I needed to make the full length
stringers for the two amas and main hull of the Seaclipper 20.
I originally intended to tackle this building step at the outset,
but I delayed making the stringers and instead focused on making
other components. Frankly, I hadn’t yet figured out how
I was going to make all the scarfs that were needed. And, I wanted
to fabricate all the stringers at the same time for efficiency
sake. With a stitch and glue background by and large, I had never
scarfed stringer stock before. Embarrassing, yes, but true nonetheless.
The one build where I needed long stringers, I laminated these
up from three layers of thin stock. It is rumored that I have
a natural propensity to avoid scarfing at any and all costs. Alas,
the rumors had been true until the jig described in this article
helped me overcome my scarfophobia.
For a few scarfs, hand tools would be the way to go. But I had
too many scarfs to make for hand tools to be efficient. The three
hulls of the Seaclipper 20 have a total of 16 full length stringers.
By ripping stringer stock from 10 and 12 foot boards, I figured
I could make each full length stringer from two lengths of stringer
stock. That means I would need to glue up 16 scarf joints, which
in turn means I needed to cut 32 scarfs. I would have to use power
tool(s) to make the joints if I hoped to do this in a reasonable
amount of time with a low scrap rate.
I almost used a table saw sled to make the scarfs until
I researched this approach online. To my chagrin, I found out
that many users of table saw scarfing sleds were getting
badly injured by the wedge shaped offcuts being kicked back by
the table saw. Even people using sound looking jigs were
getting hurt with alarming frequency. So, no table saw sled.
Back to square one, or scarf one. With the table saw out
of play, I turned to my miter saw. I noodled this possibility
for a bit. More than a bit, actually. As I continued to fabricate
other boat components, I noodled the problem for several days.
Then a few weeks passed with still yet more noodling as I made
other boat parts. Then a rough idea for a scarf jig emerged from
the noodling. The timing was fortuitous, as I was running out
of other components to make. And surprisingly, the idea worked
after only a handful of minor tweaks to the initial idea.
This article describes a jig and method that worked for me on
the power miter saw to make a host of scarf joints in stringer
stock with no scrap beyond the initial test pieces. The jig builds
fast from scraps. You might take ten minutes to build the jig
if you have all the scrap on hand. Best of all, my scarfophobia
is cured, at least for stringers.
IMPORTANT: The jig is helpful, but safety equipment is important,
too. To make scarfs using the jig, I also wore a full face shield
to protect my eyes and face in the event that the saw were to
throw an offcut at me. This didn’t happen, but it’s
best to be prepared. Also, the chop saw is loud, so I wore hearing
protection.
 1 1 |
 2 2 |
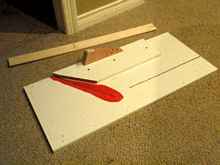
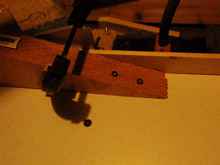
Figures 1 and 2 show the simple jig (Version 1.1; version 1.2
shown further below) sitting on the floor of my basement ready
for use. It took under ten minutes to screw the parts together
using Kreg pocket screws. Using these screws is great because
you can take apart the jig after it’s served its purpose
and the parts and screws can be used for other jigs. You don’t
have to have pockets to benefit from the advantages these screws
have to offer.
The jig has a 2 foot x 3 foot base. You can see the initial zero
clearance saw slots highlighted in red. Ideally, you should have
only one saw slot, but it took two tries for me to get a scarf
angle I liked. More details on these angles are below. Each saw
slot was made by making a cut through the base without any workpiece
in play yet. That red zone is an important safety feature and
is not merely added for purposes of this article. I need to keep
clamps, screws, etc. out of the red zone to avoid conflict with
the saw blade and guard. You can see that the base also has another
slot that comes in from the right and ends short of the saw blade
slot. This other slot is an artifact from an earlier jig using
this same base board and serves no purpose in the present jig.
Pretend it’s not there.
An angled fence block is mounted to the base board adjacent the
red zone. The fence block has a 45 degree miter on one end. The
angled fence block is securely attached to the base by three pocket
screws.
On top of the angled fence block is a hardwood wedge serving as
a clamping block. The wedge block is secured to the angled fence
block by two pocket screws at the low end. The high end is used
to clamp the jig to the miter saw. The wedge shape is not essential,
but is nonetheless convenient as it allows short screws to be
used at one end for mounting the wedge to the angled fence block,
while leaving a high end on the other side for clamping. Who knew
scrap like this would ever be useful? In the back you see a long
thin piece of wood that serves as a zero clearance backstop. Hardboard,
thin plywood, or the like could easily be used instead.
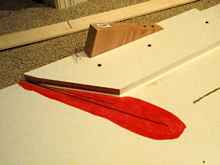
My shop boss in Fig. 3 says the jig is ready to use, so let’s
go.
 3 3 |
 4 4 |
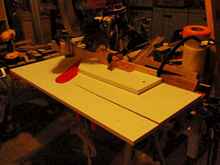
Amidst all the clutter in my shop, Fig. 4 shows the jig mounted
to my miter saw with three clamps. Further down, additional figures
will show close ups of some of these details. A first clamp secures
the wedge shaped clamping block and the right side of the zero
clearance backstop to the miter saw fence. On the left, a hold
down clamp secures the base board to the saw table. Farther out
on the left, another clamp secures the left side of the backstop
to the saw fence.
Here are some additional observations about the saw itself and
how it is set up. This is a Ridgid sliding miter saw with a 12
inch blade. The saw carriage is locked, so I am not using the
sliding function. However, I think the 12 inch blade is desirable
to make a scarf of an appropriate length. Maybe 10 inch blades
will work, but I have no tool to test that.
I played with the angle setting to get a scarf of the right length.
Recall the angled fence block was mitered at 45 degrees. I have
the saw itself set at 37.5 degrees. This makes a 7.5 degree scarf
(45 degrees minus 37.5 degrees). I initially used a 10 degree
scarf, but that produced scarfs that were too short.
Here is a feature that is important but not so obvious from the
photo. My miter saw stand is about 5 feet long, and the saw is
positioned well to the right side of the stand. This allows me
to operate the saw while standing directly to the right of the
jig and to the right of the saw stand. Due to my paranoia that
there is a risk that an offcut can be kicked by the blade, I did
not want to stand in front of the blade or to the left of the
blade. In an earlier version 1.0, I did not have a zero clearance
backstop. I had an offcut get kicked backward and bind the blade
and hit the saw’s fence loudly. With the zero clearance
backstop, no pieces got kicked. Kicking bad. Backstop good.
 5 5 |
 6 6 |
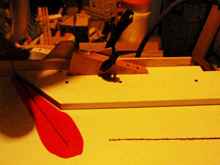
Figs. 5 and 6 are close up views of the right side of the jig
clamped to the saw.
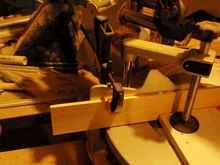 |
Fig. 7 shows the clamps used on the right side
of the saw. |
You will observe that there is a ton of clutter on a workbench
behind the saw. You are probably thinking, “Dude, clean
that up, man. It’s awful.” I generally agree but I
think it might take a full day to straighten things up. It’s
a shop task I will have to face soon, as I will need the shop
to be organized so I’ll have room to assemble the three
hulls of this trimaran.
IMPORTANT: After you clamp the jig to your saw, test the path
of your blade and make sure you are not going to hit any clamps
and that you are not going to hit your saw’s metal fences
or other components behind the back stop. Your saw path must be
clear. DOUBLE CHECK THIS.
IMPORTANT: The stringers of the Seaclipper 20 are pre-beveled
as they are ripped. Your own project also may use pre-beveled
stringers. For pre-beveled stringer stock, the scarfs to be joined
must be complementary. That is, you need a right handed scarf
and a left handed scarf so your pre- bevels match up when you
glue things together. For one piece of a complementary pair, the
pre-bevel should face outward from the 45 degree fence block during
a cut. For the complementary mating piece, the pre-bevel should
face inward. Cut these in pairs so you can confirm that you are
getting left and right handed pairs matched up. Keep the matched
pairs together. I bundle each pair with masking tape and label
them (1-1 and 1-2; then 2-1 and 2-2, etc.) in case the masking
tape falls off, which it does from time to time.
 8 8 |
To be continued...
*****

|